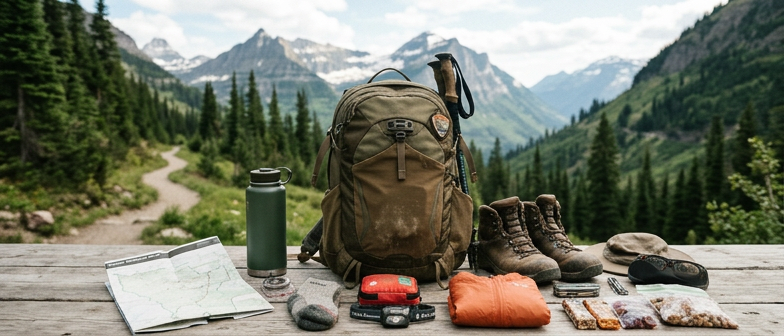
Why Packing a Thoughtful Daypack Matters in National Parks
A well-planned small backpack sits at the center of any set of National Park daypack essentials because it keeps water, snacks, layers, navigation, and basic safety items close and organized while you move. Weather, trail conditions, and energy levels can shift quickly, and a compact kit lets you stay out longer, linger at viewpoints, or wait out a brief shower without immediately heading back to your car or campsite.
Treating your daypack as part of your broader weekend outdoor checklist also makes it easier to move between short hikes, scenic overlooks, and relaxed picnic-style stops. The same bag that carries sun protection and a light jacket on a trail can hold a camera and guidebook on a scenic drive or simple picnic supplies beside a lake. Keeping one reliable pack always stocked with the basics, then adjusting a few items for each plan, supports safer choices, smooth last-minute changes, and a visit focused on the landscape instead of what you might have forgotten.
Core National Park Daypack Essentials
A well-planned daypack is the foundation of a safe, enjoyable national park visit. Think in layers: a small, comfortable pack, a lightweight insulating layer such as a fleece or thin puffer, and a compact rain or wind shell. These pieces of lightweight travel gear keep you comfortable as conditions shift between sunny overlooks, shaded canyons, and breezy ridges. Add a brimmed hat, sunglasses, and broad-spectrum sunscreen for sun protection, plus a small personal kit with tissues, hand sanitizer, and any medications you need during the day.
Navigation tools are just as important as clothing. Simple route planning before you leave the trailhead helps you choose distances and elevation gains that match your group’s abilities. Carry a paper map from the visitor center, a small compass, and a fully charged phone with offline maps. A headlamp or compact flashlight belongs in your National Park Daypack Essentials because even short outings can run late after wildlife stops or slow trail sections. A small battery pack adds a margin of safety without much extra weight.
Round out your weekend outdoor checklist with water, food, and a compact first-aid kit. Bring enough water for the hottest part of the day plus a small reserve, using either bottles or a hydration reservoir. Pack snacks that travel well and provide steady energy, such as nuts, dried fruit, or simple sandwiches, and seal them to keep crumbs out of your pack. A basic first-aid pouch with bandages, blister care, tape, and pain relievers covers most minor issues, while an emergency blanket and whistle help if you stay out longer than planned.
| Item | Main Purpose | Most Useful When | Packing Priority |
|---|---|---|---|
| Lightweight insulating layer | Stay warm in changing temperatures | Cool mornings, shaded canyons, breezy overlooks | High |
| Rain or wind shell | Block wind and light rain | Uncertain forecasts or ridge walks | High |
| Sun hat, sunglasses, sunscreen | Protect from strong sun exposure | Open viewpoints and mid-day outings | High |
| Map, compass, offline phone maps | Support simple route planning | Unfamiliar trails or longer walks | High |
| Headlamp or small flashlight | Provide light for late returns | Sunset stops or slower-than-planned hikes | Medium |
| Water, snacks, compact first-aid kit | Maintain energy and handle minor issues | Any half-day or full-day park visit | Essential |
Lightweight Travel Gear Choices for Day Trips
Choosing lightweight travel gear starts with the pack itself. For most national park day hikes, a small, well fitted backpack with a simple frame or supportive back panel is enough to carry your National Park daypack essentials comfortably. Prioritize breathable shoulder straps, a hip belt that actually transfers weight off your back, and a few useful pockets instead of lots of heavy compartments and zippers. Soft, collapsible bottles or a hydration reservoir keep weight balanced, while a compact rain shell and thin insulating layer squeeze into remaining space without making the pack feel bulky.
Small choices also affect how light your daypack feels. Swap heavy metal items for durable plastic or aluminum where it is safe, such as utensils or mugs, and carry one slim power bank with your phone instead of multiple devices. A minimalist first aid kit, compact paper map or downloaded offline map, and a small headlamp with spare batteries support safety without adding much bulk, keeping your national park daypack manageable all day.
Food, Water, and Safe Storage in the Park
Planning food and water for a full day in a national park starts with being realistic about your route, weather, and activity level. A simple weekend outdoor checklist should include enough water for steady sipping, extra for heat or delays, and packable meals that do not spoil quickly. Many visitors bring a mix of quick snacks and one or two more substantial items, such as a sandwich or grain-based salad in an insulated container. Before you leave, check park guidance on drinking water, since some areas have limited refilling points or require treating natural sources.
Thoughtful trail snack packing keeps your National Park daypack essentials light and practical. Choose stable, lightweight options such as nuts, dried fruit, crackers, nut butters, hard cheeses, and simple energy bars. Pack snacks in small, resealable bags or reusable containers so you can spread them out over the day and avoid crumbs in your pack. Keep items you reach for often in an easy-access pocket, and place anything that could leak inside a secondary bag so you can track what you have left as you hike or explore.
Safe food storage is essential both for your health and to protect wildlife, and it should be treated as a core part of any national park packing plan. Many parks require that you store all scented items, including snacks and trash, in bear-resistant containers, lockers, or a hard-sided vehicle whenever you are not actively eating. Even in areas without large wildlife, keeping food sealed and secured prevents animals from associating people with easy meals. Follow posted safe food storage tips, clean up immediately after eating, and pack out all leftovers and packaging to help keep the park environment healthy for future visitors.
Trail Snack Packing Tips for All-Day Energy
For a National Park daypack, treat snacks as steady fuel, not one big meal. Aim for a mix of carbohydrates, protein, and healthy fats so your energy stays even during viewpoints and short hikes. Dried fruit, nuts, nut butter packets, whole-grain crackers, and firm fruit like apples or oranges travel better than soft pastries or meltable chocolate. Choose compact, durable items that slip into a small pouch and keep your load light so your snacks fit smoothly with the rest of your lightweight travel gear.
Portion snacks into small, easy-to-grab bundles before you leave, using reusable bags or sturdy containers that prevent crushing. Keep a pocket for quick-access items so you are not unpacking your whole bag at every overlook. In warm weather, place food that might spoil near an insulated bottle or small cold pack, and follow safe food storage tips from the park so wildlife is not attracted to your daypack.
Planning Your Route, Scenic Drives, and Weather Backups
Simple route planning is one of the easiest ways to decide what belongs in your National Park daypack and what can stay in the car. Before you go, check park maps, official trail descriptions, and estimated times for short hikes or overlook walks so you know how much ground you want to cover. If you plan to link a few short trails with picnic stops and viewpoints, your weekend outdoor checklist can focus on water, light layers, a basic first-aid kit, navigation tools, and a compact flashlight or headlamp for late returns. Knowing how far you expect to travel, how much elevation gain is involved, and where bathrooms or visitor centers are located helps you avoid overpacking while still keeping the essentials in a lightweight daypack.
Many parks invite you to mix driving and walking, so include scenic drive preparation in the same plan. Check current road conditions and seasonal closures, and note which overlooks, short trailheads, and picnic areas line the main roads so you can place snacks, sun protection, and an extra warm layer where they are easiest to grab, whether in your pack or in the vehicle. Build in a simple weather backup by choosing a few short, lower-elevation routes or roadside viewpoints to swap in if storms, heat, or smoke change your original plan, and keep a small margin of extra food, water, and dry clothing in your car to support last-minute adjustments without weighing down your daypack.
Q&A
-
What are the core essentials for a national park daypack?
Pack water, steady snacks, a light insulating layer, a compact rain or wind shell, sun protection, a small first-aid kit, simple navigation, and a flashlight or headlamp in a comfortable pack. -
Any tips for packing trail snacks so I have energy all day?
Split food into several small portions. Mix carbs, protein, and fats—like nuts, dried fruit, whole-grain crackers, and nut butter—and keep them in one easy-to-reach pocket. -
Which lightweight travel gear matters most on a short hike?
Focus on a breathable backpack with a working hip belt, soft bottles or a hydration reservoir, a thin fleece or puffer, and a compact waterproof shell that compresses small. -
How should I store food safely around wildlife?
Follow park rules: use bear lockers or canisters when required, seal food and scented items in sturdy bags, keep packs closed, and never leave snacks unattended at viewpoints or in cars. -
How does simple route planning change what I bring for a scenic drive?
Checking trail length, elevation, and facilities first lets you carry only the water, layers, basic navigation, and emergency light you need, leaving bulkier items in the car instead.