Planning Your National Park Day Trip
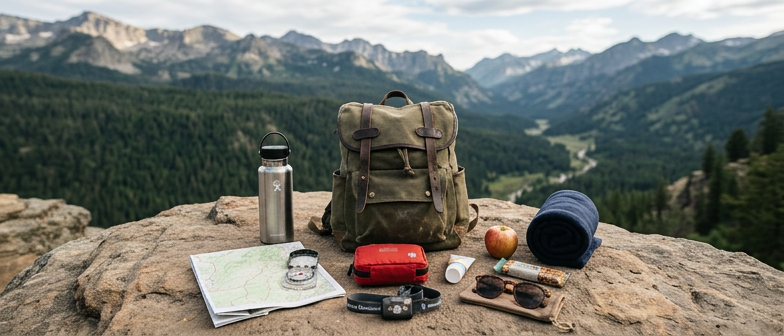
Planning a national park day trip starts with thinking about how you will move through the landscape and what you truly need to carry. Your daypack is a mobile base for National Park daypack essentials: water, food, an extra layer, navigation tools, sun and rain protection, and a few safety basics for minor changes in weather or timing. Before you load your bag, decide how long you will be out, how far you hope to go, and how remote the trails or viewpoints are. Short walks near visitor centers usually call for fewer items, while longer hikes or mixed plans, like pairing a scenic drive with a side trail, demand more careful choices so you stay prepared without feeling weighed down.
Simple route planning is the key to keeping your pack effective and light. Check official maps, trail descriptions, and seasonal alerts, then note where you will park, which paths or overlooks you will visit, and when you want to return to the car or campground. This helps you estimate water, snacks, and layers and keeps your selection of lightweight travel gear focused on what you will actually use, like a compact rain shell instead of a bulky jacket or a small power bank instead of multiple devices. Share your plan with a travel partner or leave it with someone at home, including which trailheads and roads you expect to use, so you can focus on the scenery instead of managing your load.
Core Daypack Essentials for National Park Trails
Packing a daypack for a national park hike starts with a realistic look at conditions, distance, and your own experience. At the core of any list of National Park Daypack Essentials are the basics that help you navigate, stay warm and dry, and handle small surprises. A lightweight map with a simple navigation app, a compact first-aid kit, sun protection, extra layers, and a small emergency shelter give you options if weather shifts or a trail takes longer than expected. The goal is a modest, reliable kit rather than an expedition load, so a typical day hike feels more forgiving when plans change.
Water and food usually matter more than any high-tech gadget. Carry enough water in bottles or a soft reservoir, plus a backup way to treat more if needed, as a practical balance between safety and weight. Simple, calorie-dense snacks fit naturally into a setup focused on lightweight travel gear. Energy bars, nuts, and sturdy fruit travel well, stay edible if they get warm, and can be eaten in small portions on short breaks to keep you steady on climbs or in heat.
Comfort items round out your daypack and make it more likely you will use it on every outing. A compact rain shell, light insulating layer, and thin gloves or a hat can live in the pack for the whole season, alongside a headlamp, multi-tool, and a small roll of tape for quick repairs. Choosing pieces that do more than one job, such as a jacket that blocks both wind and light rain or a bandana that works as shade and towel, keeps the load manageable without cutting corners on safety.
| Item | Best For | Priority on Short Trail Walks | Priority on Longer or Remote Hikes |
|---|---|---|---|
| Map and navigation app | Unmarked turns, confusing junctions | Medium | High |
| Water plus treatment option | Warm days, limited services | Medium | High |
| Compact first-aid kit | Blisters, small cuts, irritation | Medium | High |
| Extra layer and rain shell | Changeable mountain or coastal weather | Low | High |
| Sun protection | Open ridges, exposed viewpoints | High | High |
| Headlamp or small light | Late return, shaded forests | Low | Medium |
Choosing and Organizing Lightweight Gear
When planning your National Park daypack essentials, favor lightweight travel gear that does more than one job while keeping weight low. A compact shell that blocks rain and wind, an insulating layer that stuffs into its own pocket, and a soft bottle or small reservoir you can roll up when empty all help keep your load manageable. Choose items that stay comfortable for hours and match typical weather, trail distance, and available park services so you do not carry more than you need.
Keep your pack simple to use by organizing it in layers. Place rarely used safety items, such as an emergency blanket and small repair kit, at the bottom, midweight pieces like extra clothing and food in the middle, and navigation tools, sun protection, and a basic first aid kit near the top. Use a few small pouches to group related items, and adjust shoulder straps and hip belt so the weight sits close to your back and stays stable all day.
Smart Route Planning and Scenic Drive Preparation
Simple route planning is one of the most effective ways to stay safe and relaxed on a national park day trip. Use official park maps to choose trails and roads that match your fitness, daylight, and the time you actually have. Check distance, elevation gain, and estimated hiking times so your plan fits easily into your weekend outdoor checklist instead of forcing you to rush. Review weather forecasts, seasonal closures, and park alerts, and adjust your route at home so you are not scrambling to rethink plans in the backcountry.
Prepare for scenic drives with the same care. Confirm whether any park roads need reservations, timed entry, or have vehicle limits, and allow for slower travel on winding or unpaved sections. Plan fuel stops before remote stretches, save offline maps in case service drops, and note safe pullouts for viewpoints so you are not stopping in the road. When you treat both trails and scenic roads as one simple, written plan, your visit stays smoother, more predictable, and easier to adjust if conditions change.
Building a Weekend Outdoor Checklist
A practical Weekend Outdoor Checklist starts with simple route planning, not gear. Note your main hiking trails, likely scenic drives, and short walks from viewpoints or picnic areas, then match each activity to what you truly need for a full day in a national park. Separate National Park daypack essentials such as water, trail snacks, navigation, and basic layers from items that can stay in your vehicle or accommodation, like extra clothing, additional food, or a small cooler for after your hike.
Before you finalize your list, check the forecast, driving distances, and road conditions so you can adjust clothing, sun and rain protection, and refueling stops along the route. Keep the checklist short enough to review quickly, but detailed enough to catch easy‑to‑forget items such as a paper map or flashlight, so every morning you leave with a ready daypack and well prepared car.
Food, Water, and Safe Storage on the Trail
For a typical day in a national park, plan enough food and water to keep your energy steady without overloading your National Park Daypack Essentials. A practical guideline is at least two liters of water per person for moderate weather, with more if it is hot, dry, or the route is steep. Bring a reusable bottle or hydration bladder and, if you will be far from services, a simple treatment method like purification tablets or a compact filter. When thinking about trail snack packing tips for your weekend outdoor checklist, choose compact, calorie-dense options such as nuts, dried fruit, firm fruit like apples, hard cheese, whole‑grain crackers, or non‑melting energy bars. Pack small portions so you can eat regularly, and include both carbohydrates and protein to help you recover after climbs or longer walks.
Good food planning goes hand in hand with safe food storage so you protect both wildlife and your gear. Use sturdy, resealable bags or small containers to keep crumbs contained, and store all food and scented items together in your daypack instead of loose in pockets. In areas with active wildlife, especially where bears or other large animals are present, follow park guidance about where to eat and how to store food when you step away from your pack, and never leave snacks unattended at viewpoints or on picnic tables. These safe food storage tips help prevent animals from learning to associate people with easy meals, which can lead to unsafe encounters and harm to the animals themselves. Before you go, check the park website so your personal checklist matches local rules, whether that means using animal‑resistant lockers, never feeding wildlife, or packing out every scrap of trash, including peels, shells, and used wipes.
Q&A
-
What are the bare‑minimum essentials for a national park daypack?
Pack water, trail snacks, a map with a simple navigation app, sun and rain protection, a light insulating layer, a small first‑aid kit, and one emergency item such as a space blanket or whistle. -
Any easy tips for packing trail snacks for a full day out?
Bring small, frequent snacks: nuts, dried or firm fruit, non‑melting bars, hard cheese, and whole‑grain crackers. Use resealable bags, skip messy foods, and keep one snack handy in an outer pocket. -
How can I keep my daypack lightweight without losing important gear?
Choose multi‑use lightweight travel gear: a thin shell for wind and rain, a compressible warm layer, and soft bottles or a small reservoir. Avoid duplicates and leave true non‑essentials in your vehicle. -
What does simple route planning look like before a scenic drive or hike?
Use official park maps, match routes to your fitness and daylight, check elevation and surface, then note one or two backups in case of bad weather or closures. -
What are basic safe food storage tips around wildlife on a weekend visit?
Follow park rules: use bear lockers or canisters where required, seal all scented items, never leave food unattended, and keep snacks in your pack, not loose in the car or at viewpoints.